Showing posts with label Jewellery. Show all posts

Wednesday, May 14, 2014

Earring Tutorial: Gemstone and Linen Cord

I have been receiving a lot of compliments and questions about the earrings I made recently for the Bead Soup Swap so I wanted to put up a simple tutorial showing how I made my Labradorite earrings. For these ones I have used Labradorite and Rhodochrosite chips. 

What you Need:


Irish Linen Cord (2 x 5 inch lengths)
2 x Labradorite Chips
2 x Rhodochrosite Chips
A pair of silver plated studs


Step 1: Take a length of the Linen Cord and loop into the the stud earring making sure to keep one side of the cord shorter than the other. Secure with a knot.

Step 2:
Slide a Labradorite chip onto one end of the cord and secure with a knot. Now slide a Rhodochrosite chip onto the other side and secure with knot. Trim off any excess cord below the chips and secure with a dab of glue if needed. As I'm using waxed cord there is no need for glue here. 

And now enjoy wearing them. 


Let me know in the comments below if you have made a pair. Have you used a different cord or gemstone chip? All pictures and words in this tutorial belong to me so please ask before you use them anywhere else. 

Saturday, May 10, 2014

Bead Soup: The Big Reveal

The day has finally arrived to reveal what I have made with the beautiful beads I was sent by Ana of Acbeads. I found myself struggling a little bit at first as there was such a variety of beads that I honestly didn't know where I was going to start but finally I decided to break up the beads into different sections and ended up making four different pieces. 

As a reminder of what Ana sent to me click here to see all of the photos. And click here to see the soup that I sent to Ana.

So my first piece is a pair of earrings. I made these using the Irish Linen Cord and Labradorite Chips. I love the simplicity of them. I didn't want to loose the beauty of the Linen Cord or the Labradorite. 


My Second piece is a bracelet made using the large glass bead, blue mother of pearl discs and blue wooden beads along with the clasp from Ana's packet. I used my own seed beads and freshwater pearls along with some rose quartz that I still had from last years packet form the Bead Soup Swap. (I knew I would find something special to use the last few in eventually.) I love that this bracelet is so neutral coloured with just a pop of strong blue.

My third piece is another bracelet. I made this piece using the Labradorite Chips, Shell and clasp from Ana's packet. (If you haven't noticed I'm a little bit in love with the Labradorite now). I finished off this bracelet by just adding some seed beads that I already had in my stash. The colour is perfect with the Labradorite I think. This is my favourite of the 2 bracelets. 


My fourth and final piece is a necklace. I started by using the beautiful Focal pieces that Ana sent along with (again) the Labradorite Chips on the beautiful blue Linen Cord. I added a small copper bead on either end to tie in the copper chain and clasp from my own stash. I knew as soon as I seen these focal pieces that I would be using them with copper somehow. It is my favourite metal and I knew the colours would all suit each other. I would never normally use cord and chain like this but I'm so happy I tried it out. I think the Linen Cord is soft next to the beautiful clay beads before the harsh metal. 


I think the necklace is by far my favourite of all four pieces I have made and I cant wait to wear it over the summer. Its a nice new piece to add to my collection. 


So that's all the pieces that I have made. Please click here to see what Ana has made using the beads I sent to her. Also click here to see the list of all the participants of the Bead Soup Blog Party. I can't wait to get around all the blogs and see what everyone has made. 

Thanks for stopping by. Feel free to leave a comment below.

If you want to win the earrings above then click here to enter. 

Sunday, March 23, 2014

New Pendants and Some Fun

Yesterday I spent a few hours in the workshop making up a few new pendants. I had one final (for now) jigsaw puzzle pattern to try out as well as a new heart and star. I of course went with my hammered finish but for the heart I didn't think it would suit so I gave it a nice high shine polish instead. I'm glad I did. I think it suits the piece much better.


Later on I spent some time with my two little cousins making bracelets. They really need no help with this at all now. I cut the elastic and tie the knot thats all they want me to do. They both love to lay out the beads and play around with the order the want to put them in before stringing them which is fantastic to see them at 5 and 6 doing.


I think I will be stocking up their bead box for their birthdays next week. The box they have has suddenly gotten very empty and I'm afraid they will start "shopping" in my bead stash.

Friday, March 21, 2014

Jigsaw Puzzle Piece Pendants

Today I tried out some pieces I had been wanting to make for a while. I had these sketches in my book for a while and finally got around to making them. I made three different pieces in Aluminium, Copper and Brass. I'm really happy with how they turned out. Again I've used my hammer finish which seems to be my signature finish at this point. I may as well just embrace it. I have a few more patterns I want to try out now as well so I you may be seeing them soon. 


Friday, February 7, 2014

This Week In The Workshop

I've spent more time designing pieces this week than actually making anything so I don't have a lot to show. I do have a new pendant and bracelet that I worked on this week though so it wasn't a wasted week.


The bracelet I made using a mixed packet of pastel coloured glass pearls I got last year from Beads Unlimited. I loved all the colours in the mixed pack and wanted to use them together. I used a four strand slide clasp to finish it off. Its a very summery bracelet I think.


I also made a pendant using aluminium and copper (again) and yet again a hammered finish. I'm not finished using a hammered finish just yet but I'm sure I will get sick of it at some point soon. I like the option of this piece of being able to wear it with both pieces or each on their own.


Tuesday, January 21, 2014

Some New Pieces From The Workshop

I cut out a butterfly and heart pendant on Monday and today I got back to the workshop to finish them both. They are both made from copper sheet and finished with a high polish and then a hammered finish. I had wanted to make a butterfly for a while but kept putting it off when I had other things I wanted to make. I'm really glad I got back to make it now because it turned out better than I thought it would. The heart is a plain and simple heart shaped piece but has a lovely pattern with the hammered finish. Again I love a hammered finish and I'm using it a lot at the moment, I'm sure I will move on from it at some point but right now I really think it is suiting the pieces I am making. They are plain pieces and the hammered finish just adds that little extra.


 I then decided to make another heart shaped piece. (It must be all the valentines related things I'm seeing online at the moment.) I made an aluminium heart and a copper heart outline of the exact same size. They are only connected with the jump ring so they move about independently of each other. I really love this piece and for once I'm also really happy with how the pictures turned out, I think they show it off really well.

Friday, November 22, 2013

The Workshop

FINALLY

So my workshop is almost there and actually looks like a workshop now. I have some tools and a bench and loads of storage (thats in a huge mess and still needs organising so theres no photos of that side of the workshop just yet) so its nearly there. I can start working away at bits and pieces now because I have the things I need to cut, drill, solder and polish. My tools are basic and all hand powered but they are better than no tools at all. I do hope to get a proper torch and drill at some point when I have a bit more money but for no this will all do and at least I can say my electricity consumption wont be more than my work lamp.

This workshop has been put together using things from the house we no longer needed and building the shelves and bench (well my dad built my shelves and bench with a small bit of help from me) from scratch rather than buying so bar the few tools I have bought recently everything in handmade and recycled. I have an old blind for one window, left over flooring from the house and Ikea boxes to store everything in. Pretty basic but really what else do I need?

You may have noticed from the photo that I dont have leather for my bench. Again this came down to cost so I have a piece of that oilcloth you use as a table cover. It even has a lovely subtle pattern and goes well with my cream walls so Im happy. All in all the room in 8 foot x 8 foot. Not huge but I dont have to share it and I dont have to pack everything away so what would I do with the space if it was any bigger?

I have already started working on a little piece (you can see it on the bench peg) and will have photos of that tomorrow when I have it finished off. Seen as its the first time in 6 years I have picked up my saw and tools Im happy with how its come out. So come back tomorrow and see what Ive done.

Sunday, May 19, 2013

Kumihimo

I bought a kumihimo braiding disc and plate a little while ago and just hadn't had the time to try it out until this weekend. It is a technique that I had wanted to try for ages and knew as soon as I did I would love it. I've been working on a lot of friendship and cord bracelets lately so this is just the next step.

I have only tried using the disc so far and made a simple bracelet just to see how I would get on. Its a great repetitive pattern so after no time at all I was trying to decide how to finish it off. When I ordered the disc and plate I forgot to order some kumihimo cord ends. So instead I used the fold over cord ends that I have been using in all of my friendship bracelets.


Im not entirely happy with the ending of the bracelet but I was more just trying to get the hang of making the braid which I did so all in all I think its been a success.

Hopefully I will have a whole heap of these hanging on my arms over the summer in all different colours and patterns. I think its become another of my favourite techniques!


I decided I wanted to wear it with my diamond patterned friendship bracelet so I have attached the two bracelets onto the same toggle clasp. I prefer to attach bracelets like this onto one clasp. I just don't like having a whole heap of clasps on my arm so I try keep it as minimal as possible.


Sunday, March 31, 2013

Happy Easter!


Happy Easter everyone! I just wanted to share a few pictures of some Rosary Beads I have made in the past being the weekend that it is.


Saturday, March 30, 2013

Bead Soup Blog Party First Reveal

So today is the first reveal for the Bead Soup Blog Party. I'm in the third reveal in a few weeks time but I can't wait to see what everyone in the first reveal group has come up with.

So What Is The Bead Soup Blog Party?:This is the concept of Lori Anderson. Everyone signs up by a certain date and then she pairs everyone together. They then have to swap a pack or "Soup" of beads and make something using these beads to reveal by the certain date they have agreed to. Lori has written a book about the Bead Soup Blog Party that can be purchased here

So Who Is My Partner?:

Lori paired me with Natascha makes beautiful jewellery using natural stones and she sent me some amazing pieces (and some chocolate!!). You can see the pictures of what she sent to me here and what I sent to her. I can't wait to see what Natascha has made and I hope she likes what I have come up with using the beautiful pieces she sent to me. 

So the first reveal list has been published and you can see it here and visit some of the blogs participating and see what they have come up with. You can also see all the pieces on the Pinterest board that we will all be posting to. 

Sunday, March 17, 2013

Simple Friendship Bracelet Tutorial

I promised a new tutorial a while ago and I wanted to make something a bit new so I finally came up with making a friendship bracelet tutorial. These are making a real comeback and look great stacked up in a few different colours. I'm sure everyone has had or made one of these when they where younger and the colour options are endless!

For this one I have chosen to make a simple 4 colour design so if its your first one it will be easy to master the knotting before moving on to more complicated designs.

What you need:
4x  28 inch strands of 1mm cotton cord (or embroidery thread)
A safety pin (or selotape)
A scissors
A measuring tape

1: Cut 4 strands of whatever cord you are using in the colours you have chosen to about 28 inches each.

2: Leaving about a 3 inch tail tie a knot to secure all 4 strands together.


3: Starting with the yellow (left) strand make a figure 4 shape over the blue (second) strand.


4: Bring the yellow strand behind the blue and back through the front.


5: Now holding the blue strand pull the yellow to tighten the knot all the way to the top.


6: Now repeat the process on the blue strand again so you now have a double yellow knot.


7: Repeat this whole process again on the purple and pink strands so you have now got yellow knots across the top and the yellow strand is now on the right and the blue strand is now your first strand on the left. It will take the first few rows to get the knots to sit straight so don't mind if they are slightly wobbly.


8: Now you need to start the process again knotting the blue strand all the way across.


9: Now continue this until you have the length you are looking for.


To finish this off you can just plat the loose strands on either end so that you can secure it around your wrist with a simple knot. 

Sunday, February 24, 2013

Purple Pearl Necklace


My sister spotted these glass pearls in the Yellow Brick Road bead shop a few weeks ago and decided she wanted me to make her this necklace which is almost identical to the Gossip Girl Inspired necklace I made for her last summer using the Gold coloured pearls. The pearls are available in beautiful colours and are great quality and an even better price!

We picked out a nice 3 strand filigree clasp in gold and I made this piece as my sisters birthday present.

I love the plain front to this necklace and the fussy and elegant back.

Monday, February 18, 2013

My Bead Soup Has Arrived!

The Bead Soup From Natascha

Today I woke up to a huge box from Natascha and I couldn't wait to get into it and see what there was! Everything was wrapped and packaged so nicely and there is even 3 big bars of Swiss chocolate. I have so many ideas already that I don't know where to start. I can't believe what was in the box as my package seemed a lot smaller and I hope she is as happy as with her package as I am with mine. 

I don't work with natural stones very often, only really as a special piece so this is going to be a challenge. I sent Natascha a package with mainly glass beads and copper. These are what I love working with and I put it together before I knew who my partner was so as not to be temped to sent her pieces that she works with normally. I wanted to be challenged and I wanted to challenge Natascha too. Otherwise what was the point in doing the swap at all?. 

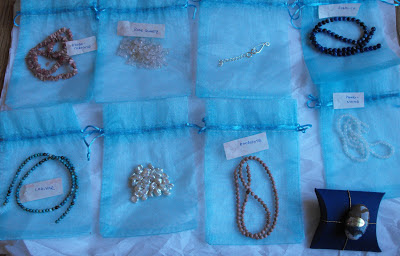
Here are the pictures of everything that was in the package:


Such a beautiful focal bead.

A Silver Clasp.


Pearls.


And now we wait while I figure out what I'm going to do with all these beautiful things I have been sent. But I can now share the picture (un-blurred) of what I sent to Natascha because she told me this morning that she has received what I sent her too. 


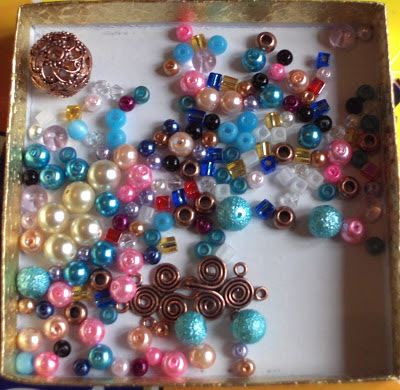
This is a collection of beads that I call my "usual" beads. I always have glass pearls, glass crystals and other lass beads in my stash and I use them in everything I do. I also sent a copper celtic style clasp with a copper focal bead and a few copper rounds to tie it together. I love copper but don't get to use it as often as I would like and as soon as I saw this clasp I knew it was the right one and built my soup around it. 

I can't wait to see what Natascha has made using these beads. Don't forget to visit Natascha's Blog here to follow here side of the Bead Soup adventure! I think I have ended up with a great partner here and I couln't be happier!